
10 Behind-the-Scenes Shorts Ideas For Brands
10 Behind-the-Scenes Shorts Ideas For Brands
I’d start with 2 or 3 behind-the-scenes Shorts formats, each showing one task and one clear result. Film vertically in 9:16, put the strongest visual in the first 3 seconds, and aim for a 30-second edit with one next step for viewers.
Here are the 10 formats I’d choose from:
- Packing Orders: Show the care that goes into preparing a purchase.
- Team Workflow: Show how a task moves from brief to approval.
- Product Setup: Help viewers see how to get started.
- Shoot Prep: Show the work behind a campaign image.
- Office Day Clips: Introduce the people doing the work.
- Founder Notes: Explain the reason behind one decision.
- Build Process: Show how a product takes shape.
- Event Prep: Show the setup and tell viewers how to attend.
- Customer Support Moments: Walk through a common problem and its fix.
- Before-and-After Production Views: Show a change with matching shots.
My rule: <u>show proof, not just activity</u>. Get permission, hide private details, add captions, and review every clip before posting. Use AI only to support explanations, label generated scenes, and keep proof-based footage real.
Then match each format to your campaign timing and track retention, comments, and CTA clicks to decide what to film next.
How to Film a Behind-the-Scenes Short
The 30-Second Behind-the-Scenes Short
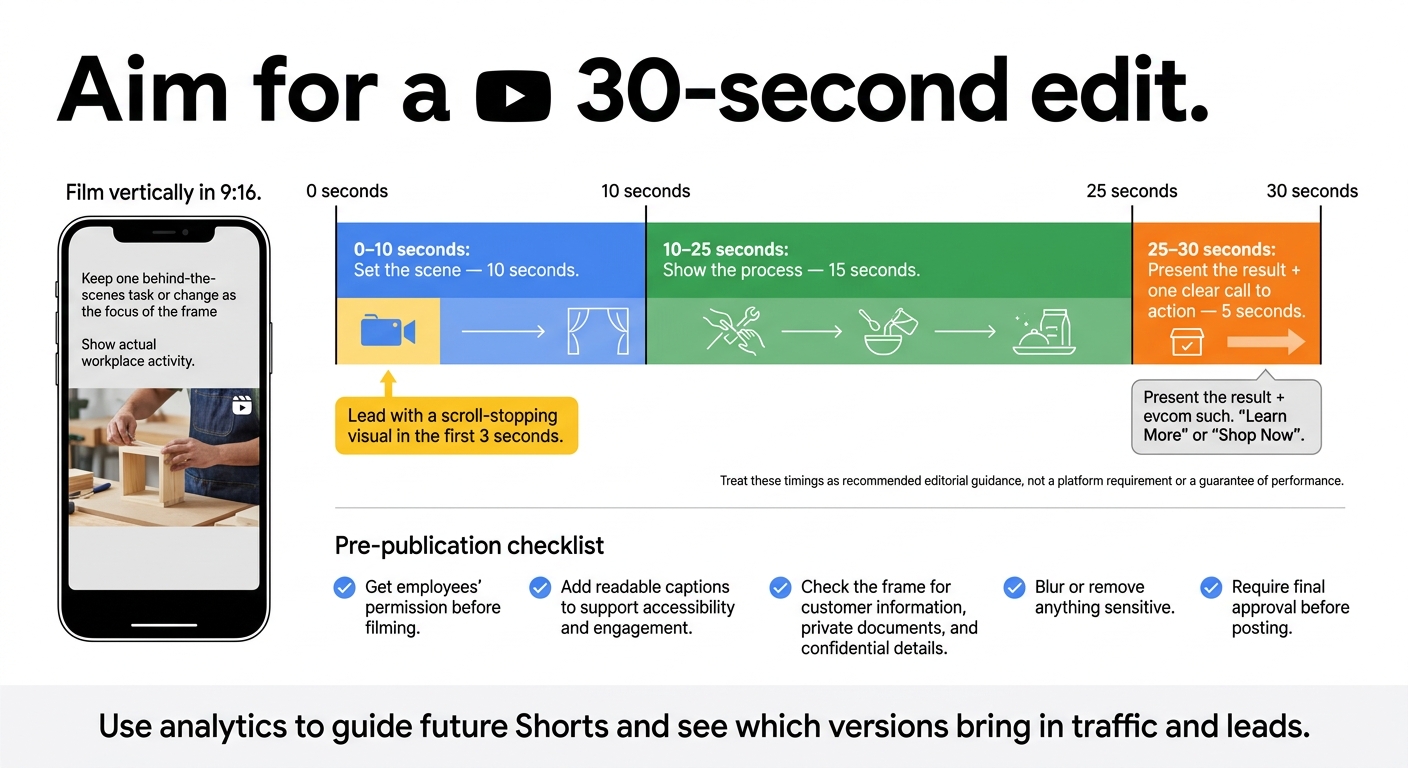
Film vertically in 9:16, keeping one behind-the-scenes task or change as the focus of the frame. Show actual workplace activity, and get employees’ permission before filming.
Lead with a scroll-stopping visual in the first 3 seconds.
Aim for a 30-second edit: spend 10 seconds setting the scene, 15 seconds showing the process, and 5 seconds presenting the result and a clear call to action.
Add readable captions to support accessibility and engagement. Check the frame for customer information, private documents, and confidential details. Blur or remove anything sensitive, and require final approval before posting.
Use analytics to guide future Shorts and see which versions bring in traffic and leads.
1. Packing Orders
Packing orders are a simple way to show customers how you care for their purchases.
What to Film
Start with the product going into protective wrap. Then show the order check, boxing, and sealing. Keep shipping labels and addresses off camera. Finish with the sealed box and one clear CTA, such as visiting the product page.
Brand Goal
Show the care that happens after checkout to build trust and demonstrate fulfillment quality. These clips work well for regular posting between launches.
When to Post
Film several packing clips in one session. Schedule them between launches, promotions, and higher-production Shorts to keep products visible without repeating discount messages.
2. Team Workflow
What to Film
Follow one task from brief to approval, showing the intake call, work in progress, and approval step. Keep confidential briefs and client details out of frame. Film only material cleared for public use. Let the process serve as proof.
Brand Goal
Show how the team makes decisions, not just how busy it is. Focus on one specific problem and its solution to show the team’s judgment, quality checks, and why clients can trust its work.
When to Post
Schedule this format early in the month to introduce your team and process.
Hook and Final Reveal
Open with the decision, then reveal the finished, approved work in the final YouTube Short.
3. Product Setup
What to Film
Film a before-and-after transformation: an empty workspace becomes a ready-to-use setup. Show each setup step in close-up, and use a cutaway shot to show internal components. This sequence makes the process easy to follow.
Brand Goal
Show the product working in an actual setup.
When to Post
Use this format when the product needs explanation, not hype. Post the Short before a launch or feature demo to quickly show how to set it up and what it does.
Hook and Final Reveal
Start with the empty workspace. By the 10–25-second mark, reveal the finished setup and show the product in use. End with one clear CTA that fits the video.
4. Shoot Prep
What to Film
Film lighting adjustments and prop placement before the shoot. Show how styling, lighting, and framing shape the final campaign image.
Brand Goal
Make it clear that campaign visuals are planned, not improvised.
When to Post
Post these Shorts in the days before a campaign launch. Batch your prep clips for the rollout, but hold back anything that gives away the full concept. Use them as teasers before the final campaign post.
Hook and Final Reveal
Start the first 0–3 seconds with a lighting shift or an unusual set angle - not a logo. Follow with quick cuts of the prep, then show the final campaign frame in the 10–25-second window. Choose a frame viewers will recognize when the campaign goes live. If the campaign hasn’t launched yet, reveal only part of it.
5. Office Day Clips
What to Film
After process-heavy clips, give viewers a more casual look at the people doing the work. Follow one team member through a typical workday moment that shows their expertise or personality. Blur screens and get every clip approved before publishing.
Brand Goal
Introduce the people customers rarely get to see. For B2B and service brands, office clips make expertise feel human and approachable. Show how the brand works when no one is watching.
When to Post
Use office day clips as easy-to-produce, evergreen content between campaigns. Film several segments in one shoot to maintain a steady posting schedule. These clips fill gaps between launch, product, and campaign-heavy Shorts.
Hook and Final Reveal
Start with the most active moment, then move quickly from problem to proof to a CTA: Follow for more team-day clips.
6. Founder Notes
What to Film
Use this format when your audience needs to know why something changed, not just what changed. Film the founder explaining one decision, lesson, or customer insight.
Show the proof behind it: a customer review that led to the change, then the result in use.
Brand Goal
After showing process clips, use founder notes to explain the “why” behind a change, launch, or pivot. The founder’s face and voice help make that reason clear and believable. Focus on trust, not a hard sell.
When to Post
Post at the start of a campaign or at a milestone. Tie the note to the specific decision behind that launch or milestone.
Hook and Final Reveal
Open with the decision, show the problem and proof, then end with one CTA. Keep the Short focused on one decision, one proof point, and one result.
7. Build Process
What to Film
Show raw material or an unfinished product, followed by the quality check and the finished product in use. This gives viewers proof of craftsmanship. Keep shots tight to avoid revealing blueprints or sensitive factory details. Use AI cutaways only to explain internal mechanics.
Brand Goal
Turn craftsmanship into proof.
When to Post
Post before launch to show how the product takes shape, then use the format as proof content during the launch campaign. For a recurring progress series, batch several clips and post weekly for several weeks.
Hook and Final Reveal
Open with an unusual shot of raw material or an unfinished product in the first 3 seconds. Use seconds 10–25 for build footage and proof of quality. End with the finished product in use to make the payoff clear.
8. Event Prep
What to Film
For launches, trade shows, and pop-ups, let the setup show what’s coming. Film the empty booth or venue, crates being unpacked, banners going up, and screens switching on. Shoot the setup in one pass to get footage for multiple edits. End with the finished space as your reveal.
Brand Goal
Show the work behind the event so viewers can see it’s real. Turn event setup into attendance content. Give them one clear next step toward attending.
When to Post
Share prep clips in the weeks before the event. Save the full reveal for your final pre-event post, with the date and location on screen.
Hook and Final Reveal
Open with the empty space and a countdown to event day. Use seconds 3–10 for unpacking and the messy middle, then seconds 10–25 to show the space taking shape. In the final 5 seconds, reveal the polished booth, add the date and location, and end with:
Register now.
9. Customer Support Moments
When buyers ask how to use the product, show the fix on camera.
What to Film
Film a support teammate working through a common setup issue. Use a screen recording or hands-on demo so viewers can follow along. Anonymize the example, or label recreated footage:
Recreated Example
Keep customer names, personal details, and account information off-screen.
Brand Goal
Show how your team solves problems after the sale. Seeing the fix helps buyers trust your team and shows that you understand the issue. It also carries the behind-the-scenes story from production and delivery into post-sale help. Use this format when support needs to show that the product delivers after purchase.
When to Post
Post after a FAQ or explainer covering the same issue. Film several fixes in one session, then schedule them into your monthly posting routine.
Hook and Final Reveal
Use a 30-second structure: show the issue at 0–3 seconds, the frustration at 3–10 seconds, and the fix at 10–25 seconds. In the final 5 seconds, show the fix working and offer one clear next step, such as:
Watch the full setup guide.
10. Before-and-After Production Views
What to Film
Film the starting state and finished result from the same angle, whether you’re showing raw materials, ingredients, or an unfinished space. Keep the framing consistent so viewers can see the change clearly. Add a few process shots to show how it happened.
Brand Goal
Make craftsmanship and quality visible through the transformation. Think process as proof.
When to Post
Place this Short right before the CTA to back up your message. Test different openings, but keep the finished result the same. Use this format when a campaign needs one visual proof point.
Hook and Final Reveal
Start with the raw state as a scroll-stopping opener. Match the framing of the finished result to connect the two, and include just enough process footage to show how the change happened. Hold the finished result on-screen while you give viewers one clear next step that fits what they’re seeing.
Then match the format to the goal and campaign timing below.
Match Shorts to Brand Goals and Campaigns
Give each Short one clear job: build trust, teach, or drive conversion. Use the map below to decide what to film and when to post it.
Each format should prove one thing.
| Brand goal | Shorts formats | Best calendar slot |
|---|---|---|
| Transparency | Packing Orders, Customer Support Moments | Regular / trust-building |
| Human connection | Team Workflow, Office Day Clips, Founder Notes | Weekly team-life slot |
| Product understanding | Product Setup, Build Process | Pre-launch / educational |
| Campaign support | Shoot Prep, Event Prep | Pre-launch / reveal |
| Before-and-after production views | Before-and-After Production Views | Reveal and explanation |
Rotate your lead format each month, film in batches, and review performance after several weeks.
For a launch, start with Shoot Prep or Event Prep, then share Before-and-After Production Views. Follow with Product Setup or Build Process to explain the product, and use Customer Support Moments to answer questions.
Use retention, comments, and CTA clicks to adjust the plan. An early retention drop likely points to an opening that needs work. A later drop may mean the explanation or proof takes too long. If viewers stay but rarely click, check that your CTA fits the content and asks for only one action.
When you’re short on live footage, fill the same calendar slot with AI-assisted cuts.
Use AI Content Alongside Real Footage
When live footage is limited, use AI to support it - not replace it. In Product Setup, Build Process, and Founder Notes, AI can help explain what live footage can’t show clearly. Keep packing, team moments, and customer support grounded in real footage.
Match every AI product visual to approved product details. Generated cross-sections must not invent internal parts or suggest unverified performance. Check every generated visual and line of narration against approved product details before publishing.
Never pass off AI-generated scenes or avatars as real employees, genuine customer experiences, or documentary footage. Clearly label digital presenters and generated scenes:
AI-Generated
Synthetic Media
For realistic synthetic content, use YouTube Studio’s applicable Altered content disclosure. An on-screen label does not replace that upload disclosure.
Sun Scroller can support AI-assisted Shorts workflows with brand review controls before publication.
Keep AI-assisted explainers separate from actual behind-the-scenes footage. For formats that rely on showing proof, use real footage.
Conclusion: Start With 2 or 3 Formats
Show your process, people, prep, and transformations to turn behind-the-scenes Shorts into proof.
Keep production simple. Start with 2 or 3 formats you can film every week. Choose them around one goal: helping viewers understand your product or building trust in your brand.
Give every Short a visible payoff that earns the viewer’s attention: a result, a transformation, or proof.
Post consistently for several weeks. Track shares, conversions, or leads, then repeat and expand the formats that perform best.
FAQs
Which BTS formats fit a small team?
Team workflow clips, office day snippets, and customer support moments work well for small teams. You can record them during the workday without a complicated production setup.
Pick one or two formats that match your brand goals. Record content in batches, or use Sun Scroller to generate videos without filming. This makes your content calendar easier to handle and helps you build reach by posting consistently.
How can I film BTS without disrupting work?
Behind-the-scenes content doesn’t have to involve filming - or interrupting your team’s work. Sun Scroller uses AI avatars, synthetic UGC, and cinematic storytelling to create on-brand short-form videos without active staff participation.
That means you can keep a steady posting schedule and showcase your brand’s processes, team, or product builds without scheduling shoots or disrupting daily work.
How long should I test a Shorts format?
Test a Shorts format for at least 4 weeks before judging the results. Posting consistently gives the algorithm and your audience enough signal to show which formats and hooks work best, helping you decide where to focus.