
5 Physical Product Video Hooks That Hold Views
5 Physical Product Video Hooks That Hold Views
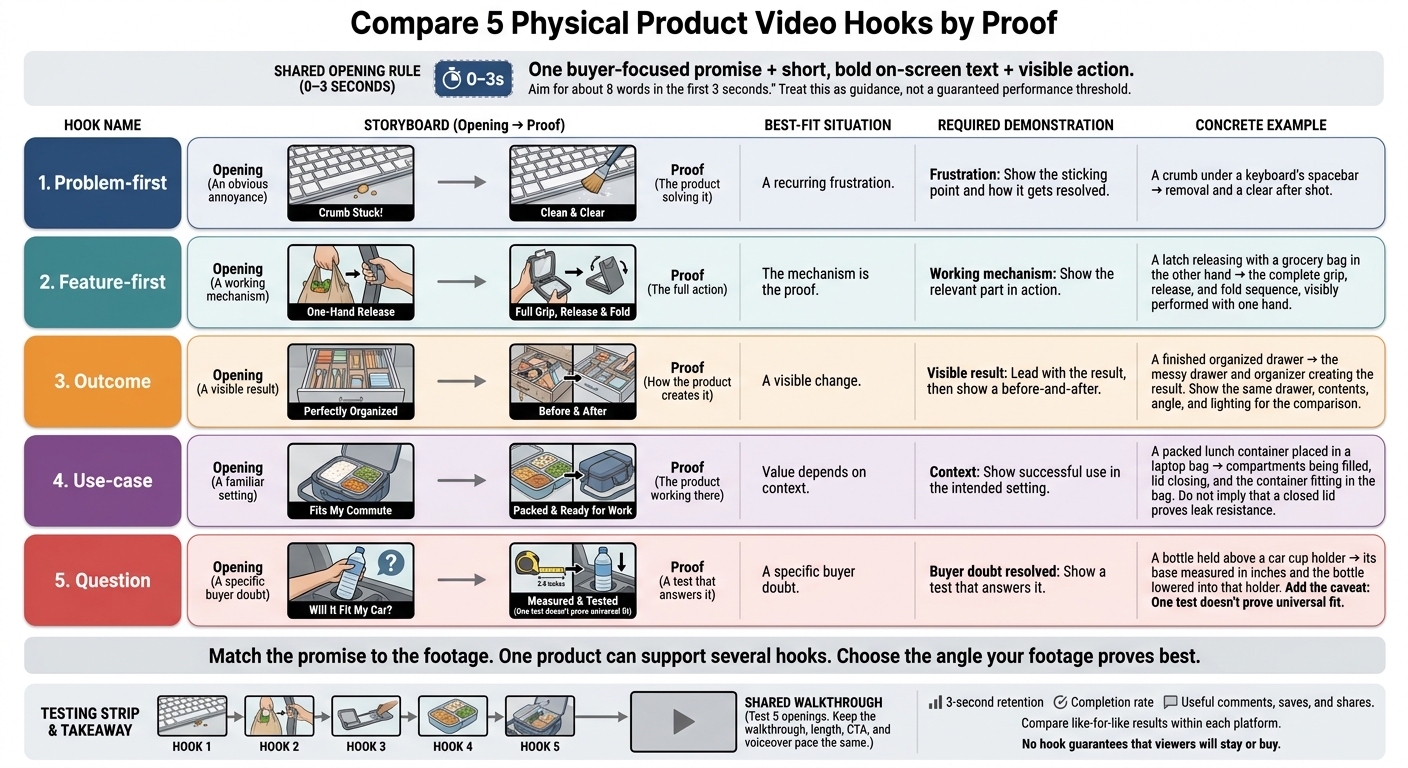
I start with what the product can prove in the first 3 seconds - not a logo or greeting. I pair one clear promise with short on-screen text, then show the action that backs it up.
I choose from five openings:
- Problem-first: Show a frustration, then the fix.
- Feature-first: Put the working part in motion.
- Outcome: Show the finished result before the steps.
- Use-case: Show where and how the product fits into daily life.
- Question: Test a buyer concern, such as whether a bottle fits a car’s cup holder.
Quick Comparison
| Hook | Best starting point | What to show next |
|---|---|---|
| Problem-first | An obvious annoyance | The product solving it |
| Feature-first | A working mechanism | The full action |
| Outcome | A visible result | How the product creates it |
| Use-case | A familiar setting | The product working there |
| Question | A specific buyer doubt | A test that answers it |
My rule: <u>match the promise to the footage</u>. Then I test all five openings with the same walkthrough, length, and call to action. I compare 3-second retention, completion rate, and useful comments, saves, and shares - not just views. No hook guarantees that viewers will stay or buy.
5 Product Video Hooks: Match the Hook to the Proof
3 Basics of a Product Video Opening
Make the first frame easy to read at a glance. Show enough of the product for viewers to recognize it and follow the action. A striking visual can stop the scroll, but it needs to match the claim.
Make one buyer-focused promise. Lead with one benefit the walkthrough can prove. Aim for about 8 words in the first 3 seconds. Only promise what the footage can show.
Pair that promise with short, bold on-screen text so viewers watching without sound understand the opening. Use voiceover to support the point, not replace it.
Move straight into proof. In the next shot, show the product delivering on the promise. If viewers need context, state the pain point in one line, then show the fix.
Choose the hook style that fits your product’s strongest proof using these basics.
1. Problem-First: Start With a Frustration
Opening Shot and Sample Line
Start problem-first hooks with the annoyance, not the fix.
For a keyboard-cleaning demo, open with a macro close-up of a crumb under the spacebar. Show a finger pressing the key; add resistance or a crunch sound only if the footage truly shows it.
That crumb under the spacebar is impossible to ignore.
When to Use This Hook
Use this hook for everyday consumer products with an obvious annoyance viewers can spot instantly on camera.
From Hook to Walkthrough
Give the hook the first 3 seconds, then move from the obstacle to the feature to the benefit.
Product Proof
Show the removal and the after shot clearly. Let the voiceover support the footage - not stand in for it. Make claims only about what viewers can see.
2. Feature-First: Show How It Works
When the mechanism is the hook, start by showing it in motion.
Opening Shot and Sample Line
Frame the latch close enough to show it release, with a grocery bag still in the other hand.
Sample line: Open it with one hand, even when yours is full.
When to Use This Hook
Use feature-first when the mechanism is the proof. Once it stops the scroll, show the full sequence.
From Hook to Walkthrough
Pull back to show the grip, release, and fold in that order. Match each line to the action.
Product Proof
Keep the entire motion on screen so viewers can see that it takes just one hand.
3. Outcome: Show the Result First
Lead with the result. Use this hook when the finished outcome sells the product before viewers need to understand how it works.
Opening Shot and Sample Line
Frame the finished drawer for 1–3 seconds. Make the finished result the focus.
Sample line: Everything in place. Here’s how.
When to Use This Hook
Choose outcome-first when viewers can see the improvement at a glance.
From Hook to Walkthrough
After showing the finished drawer, walk viewers through how it got that way.
Cut to the messy drawer, then to the organizer. Show the steps that create the organized result.
Spend the next 10–25 seconds showing the change rather than explaining it.
Product Proof
Keep the same drawer, contents, angle, and lighting in both shots.
4. Use-Case: Show the Product in Context
Opening Shot and Sample Line
In the first 0–3 seconds, show the lunch container packed for a commute, then place it in a laptop bag.
From there, keep the same scene and show the steps that make the use case work.
Sample line: Lunch packed. Ready for the commute.
When to Use This Hook
Use this hook when an everyday situation helps explain the product’s value. Set the scene, then show how the product fits into it.
From Hook to Walkthrough
After the opening shot, walk viewers through packing. During 10–25 seconds, show food going into the compartments, the lid closing, and the container fitting into the bag. Keep the product in view so each step is easy to follow.
Product Proof
Show the compartments keeping food separate, the lid closing, and the container fitting clearly into the bag. If you claim leak resistance, show a handling test - a lid snap alone doesn’t prove it.
5. Question: Answer a Buyer Concern
Opening Shot and Sample Line
In the first 0–3 seconds, hold the bottle above a standard car cup holder. Keep both in frame so viewers can see exactly what you’re testing.
Sample line: Will this bottle fit in my car’s cup holder?
When to Use This Hook
Use a question hook when doubts about fit could stop someone from buying. Focus on a specific concern buyers already have:
Will the product fit a cup holder, laptop bag, or kitchen cabinet?
From Hook to Walkthrough
Go straight from the question to proof. In the next 10–25 seconds, measure the bottle’s base in inches, then lower it into the cup holder. Make sure the on-screen measurement matches the voiceover. Show the design detail that helps it fit, such as a tapered bottom.
Product Proof
Keep the demonstration focused on fit. Name the tested car model and give the bottle’s exact base diameter so buyers can compare it with their own cup holder.
One test doesn’t prove universal fit. Cup holder depth and shape also matter, so the demonstration only proves compatibility with the setup shown.
Choose the buyer concern your footage can answer fastest.
Match the Hook to Your Product Proof
Start with what your footage can prove. Then write the hook around it. Use this matrix to choose which of the five hook types above your footage can prove fastest.
| Hook style | Best-fit situation | Required demonstration |
|---|---|---|
| Problem-First | A recurring frustration. | Frustration: Show the sticking point and how it gets resolved. |
| Feature-First | The mechanism is the proof. | Working mechanism: Show the relevant part in action. |
| Outcome | A visible change. | Visible result: Lead with the result, then show a before-and-after. |
| Use-Case | Value depends on context. | Context: Show successful use in the intended setting. |
| Question | A specific buyer doubt. | Buyer doubt resolved: Show a test that answers it. |
One product can support several hooks. Choose the angle your footage proves best.
Check that the demonstration right after the hook delivers exactly what it promises. If it doesn't, narrow the wording or choose another angle.
Apply this check before testing the same walkthrough with multiple openings. Once each hook matches the proof, test those openings with the same walkthrough.
Test 5 Openings With the Same Walkthrough
Once the hook matches the proof, test only the opening. Make five versions, each with a different first 0–3 seconds. Keep the walkthrough, length, CTA, and voiceover pace the same.
Compare like-for-like results within each platform. Track these three signals:
| Metric | What it helps assess | Limits |
|---|---|---|
| 3-second retention | Does the opening hold attention? | Retention doesn’t prove purchase intent. |
| Completion rate | Do viewers stay through the ending? | Completion doesn’t prove purchase intent. |
| Useful engagement | Do useful comments, saves, and shares suggest product interest? | Bait and controversy can inflate activity without increasing buyer interest. |
For paid tests, give platforms an initial 3–5-day observation window before making a decision. They need time to learn.
Conclusion: Show Value, Then Explain the Product
Pick the hook your footage can prove fastest: frustration, mechanism, result, context, or buyer concern.
Match the hook to the proof, then go straight to the action that backs up your promise. Save the details for the walkthrough.
Show value first, then explain the product.
FAQs
Can I combine two hook styles in one opening?
Yes. Combining hook styles - like pairing a problem-first statement with a question - can help grab attention in the critical three-second window. Each style has a purpose. Together, they can create a stronger visual and auditory interruption that stops the scroll. Use both if they make your opening more engaging or relevant to your audience.
How do I hook viewers if my product’s benefits aren’t visible?
If your product’s benefits aren’t obvious at a glance, lead with the outcome or the problem it solves, not the product itself. Stop the scroll with a pattern interrupt: a bold statement or a direct callout to your audience’s pain points.
Back up your message with before-and-after results, client testimonials, or case studies that show what your product helps people achieve.
Which hook wins if retention and engagement disagree?
When retention and engagement metrics tell different stories, let conversion data guide your decisions. Start with a small budget, then give the platform three to five days to collect enough data before making changes.
Put more budget behind hook variations that convert and pause those that don’t. Use those results to shape your next round of ads - not gut reactions or isolated metrics.